How to Measure Windows
Measuring your windows so you can shop for replacements can be done in three simple steps. To find the right window size, you first need to measure the rough opening.
What Is a Rough Opening For Windows?
Put simply, the rough opening is the hole in the wall where the window will go. It will be a bit larger than the actual window size you need. Rough opening measurements need to be as precise as possible so that your window will fit securely into the available space. That means measuring the rough opening’s width, height, and depth in multiple areas.
In the illustrations below, we show you where to measure the rough opening and why.
Step 1: Measure Horizontally to Find the Rough Opening Width
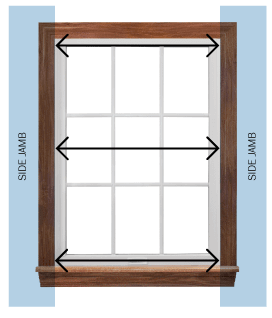
The first measurement you need to find is the rough opening width. Get a tape measure and measure from one edge of the window frame (also called the side jamb) to the other in the following order:
- Measure the distance horizontally across your frame at the top, at the middle, and at the bottom from each side jamb. Write down each measurement.
- Next, circle the smallest of the three measurements.
- The smallest measurement is your rough opening width. This is the main measurement to reference when purchasing a replacement window.
Tip: Always list window measurements with width before height.
Step 2: Measure Vertically to Find the Rough Opening Height
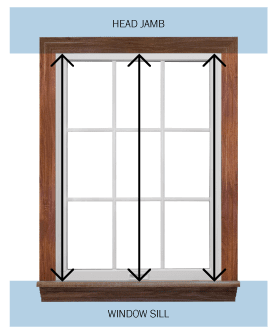
After width, you need to find the rough opening height. This time, you will measure from the top edge of the window frame (also called the head jamb) to the bottom edge (the window sill). Here’s how:
- Measure the distance vertically across your frame from top to bottom on the left, middle, and right side of the window from head jamb to the window sill. Write down each measurement.
- Again, circle the smallest measurement of the three figures. This is your rough opening height.
Tip: If your window sill is sloped, measure from the highest point of the window sill right against your window glass.
Step 3: Measure the Window’s Depth
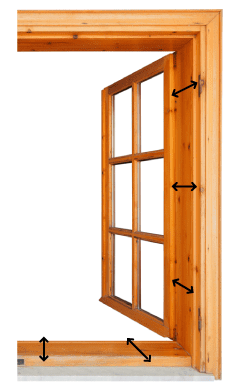
Finding the correct depth is important because some windows will be too deep to fit into a replacement window opening. Take a look at where the black arrows are in the illustration above; that’s where you’ll want to measure. Here’s how:
- Make sure your window is open so you can measure the full depth of the frame.
- Run your tape measure from the outside of the frame to the inside. You’ll want to go from edge to edge.
- Do this in several locations around the window frame and write down each measurement.
- Once again, the smallest measurement will be used as your window depth.
If you can not open your window, measure the depth on each side of the glass and add them together. Then add the thickness of your window glass pane. A single window glass pane is usually 1/8″ or 3mm in thickness.
Rough Opening Size vs Replacement Window Size
Now that you have the rough opening measurements, you can use them to purchase windows that will fit nicely into the space. However, your rough opening size and your replacement window size will be slightly different sizes.
The replacement windows should be approximately two inches narrower and two inches shorter than the measured space.
Use the depth measurement to ensure that your windows will not be sticking out of the frame opening. You do not need much (if any) extra room removed from your depth measurement to find the right window size.
If you want to check your measurements, you can learn more about the standard window sizes you can expect to find by reading our guide.
Cutting a Rough Opening for a Replacement Window
What if you are doing things the other way around and cutting a rough opening for a window you’ve already purchased?
Take the measurements of the window you bought using the steps above. The depth can be the same as the window measurements, but the height and width of the opening both need to be two inches larger than the window to account for one inch of space on all sides. This leaves you with space to make adjustments, which will help keep the window level and plumb during installation.
Unless you have experience cutting rough openings and installing a frame for windows, this job is best left to professionals. Cutting a hole that’s too big or accidentally cutting into crucial structures in your home’s frame are difficult and expensive problems to solve.
How to Measure For Window Frames
Typically, when a homeowner is buying a replacement window, there is an existing window in the rough opening. The process for taking measurements above assumes you already have a window and simply need to replace it.
However, if you have a new construction home or have cut a brand new opening where you do not have a window already, then you are instead measuring for window frames. This means that instead of measuring an existing window to find the size of the rough opening, you are measuring the rough opening itself.
You can repeat the exact process that is outlined above, but instead of adding two inches to the height and width, you instead want to account for a half-inch gap around all sides for shimming and insulation.
How to Measure For Window Glass
Measuring for new window glass is a bit different, though you’ll recognize some of the steps. Here’s what we recommend:
- Remove the old glass (if applicable). If you’re replacing broken glass, carefully remove the remaining pieces. Make sure to wear protective gloves and glasses to avoid injury.
- Clean the frame. Clean the area where the glass sits within the frame or sash to remove any debris or old putty that may affect your measurements.
- Measure the opening. Like you’ve seen above, you will now use a tape measure to measure the height and width of the opening where the glass will sit. It’s crucial to measure from the inside edges of the frame where the glass actually rests (often referred to as the rebate). Measure in multiple places along both dimensions, just like you would for a replacement window: measure the width at the top, middle, and bottom, and measure the height on both the left and right sides. Use the smallest measurements to ensure the glass will fit.
- Subtract for clearance. Subtract a small amount from both the height and width measurements to ensure the glass pane will fit without binding and has room for expansion. Typically, this is about 1/8 inch (3 mm) from both the height and width. This clearance helps accommodate any slight irregularities in the frame and allows for expansion and contraction due to temperature changes.
- Consider glass thickness. Check the thickness of the existing glass (if replacing) or determine the required thickness based on the window frame and the type of glass needed. The thickness can impact the fit and performance of the glass, especially for insulation.
- Order the glass. Take your measurements to a glass supplier. Provide the exact dimensions you’ve calculated, specifying that these are the “cut size” for the glass. Make sure to mention any special requirements like tempered glass if necessary for safety.
You can read more about the various types of glass available for windows as well as glass replacement costs by visiting our guides.
How to Measure For Window Screens
Measuring for window screens is similar to measuring for window glass but with a few specific considerations to ensure the screen fits properly and functions effectively.
- Pick your screen type. First, determine if the screen will be installed on the inside or outside of the window frame, as this affects how you measure. Most screens are installed from the outside.
- Measure the screen frame area. Use a tape measure to measure the height and width of the area where the screen frame will fit. This is typically the area inside the window frame where the screen will rest. Measure the width at the top, middle, and bottom of the window. Then, measure the height at the left, center, and right sides. Use the smallest measurements for both width and height to ensure the screen will fit within any slight variances in the frame size.
- Check for obstructions. Look for any hardware or design features on the window frame that might interfere with the placement of the screen, such as window handles or locks. You may need to account for these by adjusting the screen size or the mounting method.
- Decide on a mounting method. In an inset mount, the screen fits inside the window frame. You’ll need to ensure the screen has a suitable frame to hold the mesh and fit snugly inside the window frame. In an overlap mount, the screen overlaps the window frame and is often attached with fasteners or hinged. Measurements should include any additional space needed to accommodate the mounting hardware.
- Subtract for fit. For an inset mount, it is usually advisable to subtract about 1/16 inch from both the height and the width to ensure the screen fits easily within the frame without bowing or bending.
- Note the screen frame thickness. Measure the thickness of the existing screen frame if you are replacing a screen, or determine the appropriate thickness based on the screen type and the depth of the window frame.
Why Are Window Measurements So Important?
Regardless of whether you’re measuring for a replacement window, a brand new frame, or new glass, getting the wrong size can not only impact your window fitting in the first place but also its overall efficiency.
If there are gaps where air can leak in or out, you’ll have higher utility bills in addition to struggling to maintain a consistent, comfortable temperature inside your home.
In addition, getting a window that’s the wrong size can make your installation much more difficult. While a skilled contractor may be able to help make your window fit, your labor costs will increase as the installation gets trickier. That means you’ll wind up paying more to have your window installed than if you had a window that was the correct size.
How to Hire a Window Contractor
You can attempt to install replacement windows on your own, but there are a lot of things that can potentially go wrong. If you are unsure about any of the steps, or if you don’t have construction experience, it is best to leave the work up to a professional. Sure, you will spend a bit more money, but you will save time in the process as well as benefit from a window warranty when a licensed professional handles the installation. Best of all, you will have peace of mind that your windows will keep your home safe, protected, and comfortable for years to come.
We always recommend getting three to four quotes to find the best price for your project. You can use our contractor directory to compare pros in your area, or you can ask Modernize to do the research for you. Click below and answer a few questions about your project to get matched with up to four pros.
Compare top-rated windows pros in your area.
Read real homeowner reviews, explore qualifications, and view promotions. Modernize makes it easy to browse professionals and find one that will be perfect for your project.