Are you doing a flooring project?
Modernize can pair you with three to four pros in your area, so you can compare options and save time and money.
We tend to have a love-hate relationship with vinyl floors. It’s inexpensive, usually comes in convenient sheets or rolls, and is easy to install. Vinyl can also be found in a wide array of colors that can be matched to any style and room. However, once you’ve installed it, it can be a pain to replace it when you’re ready to redecorate or freshen up a room’s look.
Maybe you’ve moved into a house and found unsightly vinyl floors in the master bathroom or a dated faux-brick pattern on your kitchen floor. There are a variety of options available when you need to update vinyl floors. But if you are looking for a quick solution that won’t break the bank, you should consider simply painting them.
Can You Paint Vinyl Floors?
Yes, you can actually paint vinyl floors.
There are several reasons why painting your vinyl floors is a great solution. The most obvious benefit is that it saves you the trouble of having to pull up your floors, a laborious and sometimes frustrating process that can bring a person to tears. It’s also a versatile solution. Not only is it quick, but you can repaint your vinyl floor again and again, anytime you want.
If you’re going to paint your vinyl floors, you definitely want to do it the right way. With these simple steps, you can paint those vinyl floors and give them a much-needed makeover.
Tools to Paint Vinyl Floors
As you get ready to paint, you will want to take a trip to your local hardware or home improvement store to pick up a few things. Here are the tools you will need to paint your vinyl floors.
- Latex primer, the same as you’d use on walls
- Porch and floor paint, enough to cover the area
- Painters’ tape, for trim or patterns
- Heavy-duty cleaner
- Paint rollers and brushes
- Sander and sandpaper
- Caulk for repairs
Once you have these tools, you are ready to get started. Follow the steps below to paint your vinyl floors.
Step 1: Planning
Do you want to paint your floors a single color, or will you be using more than one color for your pattern or stencil? During the planning stage, you’ll decide your plan of attack and tweak the supply list so that you have everything you will need to paint your vinyl floor.
Step 2: Cleaning
Remove all the room’s furniture, including appliances. Then use a heavy-duty cleaner to thoroughly clean your floors and clear them of all dirt, grime, and any other debris.
Find the Right Contractor for Your Flooring Project
Whether you’re ready to begin your project now or need some expert advice, our network of contractors are here to help. With a few simple questions, we’ll find the best local professionals for you
Step 3: Sanding
Vinyl floors have a shiny finish that you’ll need to remove prior to painting them. Use a sander, preferably a circular one, and sandpaper to remove that finish and get your floors ready for priming.
Step 4: Repairing
If there are any holes, gashes, or other wear and tear on your vinyl floors, you’ll need to repair them. If not, you can skip this step. To repair your floors, squeeze caulk into the wounds and spread it around so that it covers the whole area, and then scrape the excess away, leaving a smooth surface behind.
Step 5: Priming
You can use a standard wall primer to prime your vinyl floors. Roll on one or two coats and then let dry completely. You may consider priming in the evening so you can let it dry overnight before applying paint.
Step 6: Painting
Make sure the paint you use is either designer for outdoor use or for flooring—you want paint that’s made to be walked on and can withstand some wear and tear. If you have trim that you’re not painting the same color as your vinyl floors, you’ll want to do some taping.
Many have found the easiest way to paint floors is to simply pour the paint onto the floor in small sections, then spread it around with the rollers and brushes. Apply the first coat of your base color to your vinyl floors and allow to dry completely. Once dry, apply a second coat and allow to dry.
Step 7: Patterns, stripes, and designs
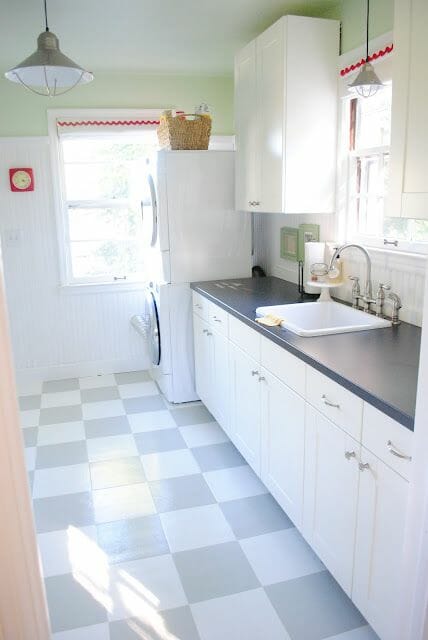
If you’re applying stripes or a pattern, you can lay down the tape for your design once both coats of your base color are dry. If your vinyl has a texture that features some sort of geometric pattern, you could use that texture to help you lay down your pattern evenly, or you could measure the pattern by hand. Apply the other color(s) to the designated areas, then allow them to dry. You’ll probably want to add a second coat, too.
Once your floors have completely dried, you’re ready to bring your furniture back in and enjoy the fruits of your (minimal) labor. Painting vinyl floors is a great alternative to more costly means of freshening up your floors, most of which are going to involve pulling up your vinyl floors with your bare hands. With this method, you’re not only saving time and your back, but giving your bathroom, kitchen, or laundry room a fresh new look that is easy to do and easy on your wallet.
Find the Right Contractor for Your Flooring Project
Whether you’re ready to begin your project now or need some expert advice, our network of contractors are here to help. With a few simple questions, we’ll find the best local professionals for you
Reviews from Real Homeowners
Welcome to Homeowner Resources! We are the Modernize blog. Modernize pairs more than 3 million homeowners a year with pre-vetted contractors in their area. This blog started because we believe homeowners should know everything about their homes, from how their HVAC works to which front door colors they might love. On Homeowner Resources, you can find information on every part of your home, right down to how you can negotiate with contractors to get the best price. Here's more about the blog.
Need a contractor? Learn more about how Modernize finds the right pro for you.
