Are you doing a kitchen remodel project?
Modernize can pair you with three to four pros in your area, so you can compare options and save time and money.
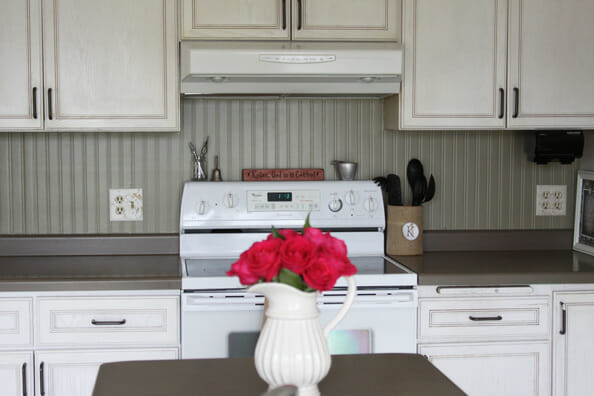
Sure, that antique kettle and lace curtain treatment add Victorian nuance, but if you really want to ratchet up the quaint factor in your kitchen, a beadboard backsplash is one of the fastest ways to get there. Plus, it’s so much more affordable than tile, and it’s super easy to install, to boot!
So what is beadboard, you ask? It’s a type of paneling made out of planks of wood (the “board”) and a small indentation (the “bead”). Beadboard originally popped up in cabinetry, but you’re probably most familiar seeing it in bathrooms. It’s popular there, often installed along the bottom of the wall, because it’s an inexpensive alternative to tile—and also because, unlike tile, it can be cut to any length. Coincidentally, these are the exact same reasons that make it perfect for kitchens.
What does it take to install one of these backsplashes, and what do you need to consider before jumping on the beadboard train? Let’s dive into the nitty gritty and decide if beadboard is best for you!

via Fern Creek Cottage
Genuine Beadboard vs. Beadboard Paneling
The word beadboard actually refers to two different types of paneling: genuine hand-assembled beadboard and its manufactured lookalike. Genuine beadboard consists of tongue and groove boards that are fitted together at the bead point. Manufactured beadboard means plywood, fiberboard, or wood paneling in large pieces which have been cut to mimic the tongue and groove effect.
Handcrafted beadboard has the benefit of quality, but as in all things in life, if you want handmade, you’ll have to pay for it. Genuine tongue and groove beadboard is much more labor-intensive to make, and therefore more expensive. So if you want to reap the financial benefits of beadboard, you’ll need to opt for beadboard paneling.
Individual boards also have a tendency to warp and ruin the fit of the grooves—especially in moisture-heavy areas like the kitchen. For these reasons, we highly recommend paneling in a backsplash, unless you just cannot live without the real thing.
Find the Right Contractor for Your kitchen-remodel Project
Whether you’re ready to begin your project now or need some expert advice, our network of contractors are here to help. With a few simple questions, we’ll find the best local professionals for you
Shopping for Beadboard
There are a couple different considerations when it comes to picking out your beadboard. For one thing, you want to think about the width of the board and the depth of the bead. Wider boards add a soothing effect to a busy, cramped kitchen, while narrower is a good choice if you need to tie a large room together (but don’t go any thinner than ¼ inch). As to the bead, the deeper it is, the more you’ll get that look of handcrafted quality (and avoid the fakey appearance of paneling), but keep in mind, very deep grooves can also be tricky to clean. Also, have a look at samples of the paneling you’re purchasing before committing: quality board will have a neat, clean bead rather than one that looks ragged.
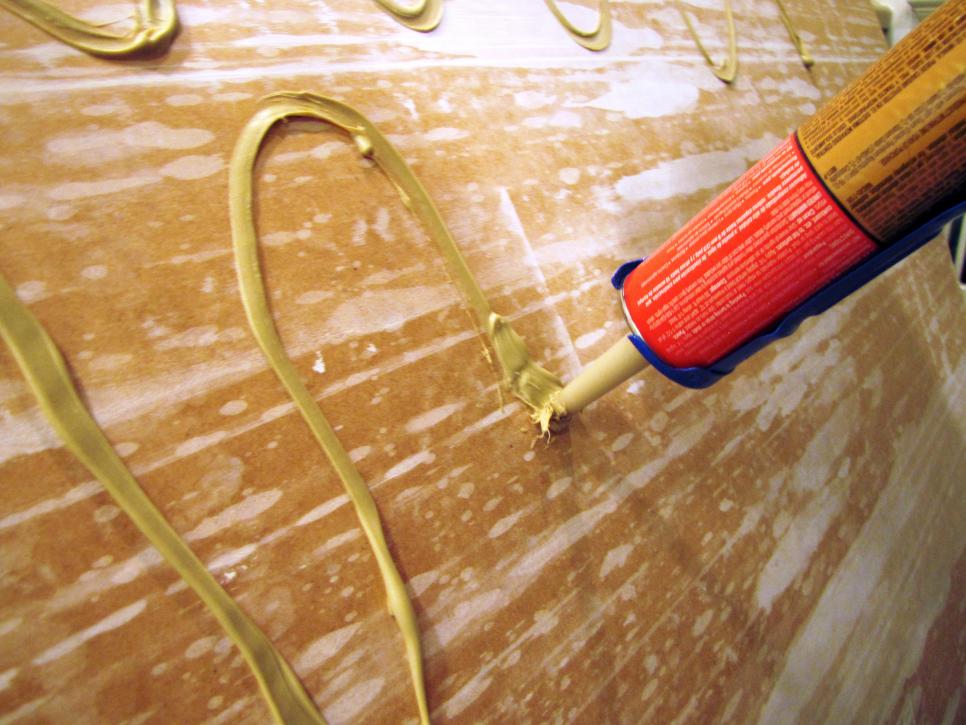
via DIY Network
Installation
Installing a beadboard backsplash is not exactly brain science, but still, it can be a frustrating and tedious task if you aren’t careful with your measurements. Make your life easier by working in four-foot sections, and double and triple check the size and location of any outlets or cuts you need to make around low-hanging cabinets. Use a circular saw, and line the beadboard up against the wall to double check your work.
Once you’re pretty sure you’ve got your measurements down, attaching the wall is pretty simple. You just load a caulk gun with liquid nails and apply it across the back of the board in a looping pattern, lay it against the wall, and staple gun it into place. Fill your holes, and you’re ready to paint! It’s so easy you could have it installed in an afternoon—compared to hours spent laying down tens or hundreds of tiles.
Use Color to Add Modern Flair
Even if country cute makes you gag, you can still reap the benefits (and savings!) of installing beadboard. You don’t have to stick to the traditional whites and creams when painting. For instance, we love the idea of using a dark beige, slate blue, or mint green for a look that’s a little bit country and a yet edgy, too.

via A Spotted Pony
Cleaning
Beadboard paneling has an added benefit in that because there’s no joints, there are less places for moisture and mildew to hide away from your scrub brush. But it can still be a little difficult to clean, which is of the highest order for taking care of those messy stove splatters. Because wood is somewhat delicate, it’s best to stay away from the harsh cleaners you may use on your stove and countertops. Try to wipe off whatever you can with a microfiber cloth (and do it as soon as possible, since wet wood means warping). Then finish up any really tough spots with a water and vinegar solution, using a toothbrush or small, soft scrub brush to get in between cracks. You’ll have it clean in no time!
Find the Right Contractor for Your kitchen-remodel Project
Whether you’re ready to begin your project now or need some expert advice, our network of contractors are here to help. With a few simple questions, we’ll find the best local professionals for you
-
 cost and budgeting
Affordable Home Upgrades
We’ve all had that moment walking into a room thinking, “It’s fine, but…” Sometimes it’s dated hardware. Sometimes it’s lighting. Sometimes it’s just that nothing feels fresh anymore. Here’s the... -
 contractor selection
A Complete Manual J Guide
Manual J Load Calculations: The Essential Guide to Sizing a Home HVAC System Correctly When a homeowner needs a new HVAC system, one of the most important — yet least... -
 installation
15 Practical Ways Homeowners Can Use a Generator
More Than Just Backup Power When people think about generators, they often picture them humming away during a blackout. While that is their most common role, generators are surprisingly versatile.... -
 cost and budgeting
The Real Costs and Benefits of Installing a Whole-House Generator
Why Homeowners Consider Whole-House Generators A whole-house generator is more than just a convenience — for many homeowners, it’s peace of mind. Unlike portable units, these generators are permanently installed,...
Reviews from Real Homeowners
Welcome to Homeowner Resources! We are the Modernize blog. Modernize pairs more than 3 million homeowners a year with pre-vetted contractors in their area. This blog started because we believe homeowners should know everything about their homes, from how their HVAC works to which front door colors they might love. On Homeowner Resources, you can find information on every part of your home, right down to how you can negotiate with contractors to get the best price. Here's more about the blog.
Need a contractor? Learn more about how Modernize finds the right pro for you.