
Are you doing a windows project?
Modernize can pair you with three to four pros in your area, so you can compare options and save time and money.
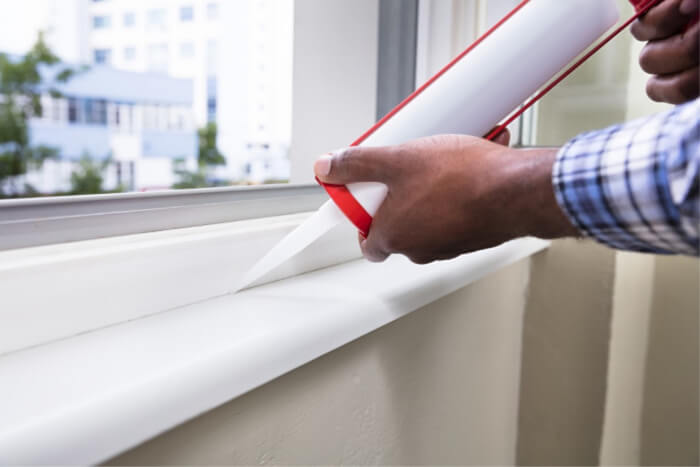
Reducing the amount of air leakage in your home is a cost-effective way to decrease heating and cooling costs, improve durability, increase comfort, and create a healthier indoor environment. To prevent air leakage, homeowners can explore window caulking. Use caulk to seal, or reseal, windows from the outside elements.
Caulk is an affordable, flexible substance used to repair cracks and gaps less than a quarter-inch wide. Caulking windows is an easy DIY task that can save homeowners up to 8% on home heating and cooling costs, assuming the window is otherwise energy-efficient.
While caulking can be applied to the interior and exterior of windows, it’s important to understand which window areas benefit most from this home improvement — and what areas should be avoided.
How to Detect Leaks in Your Windows
First things first: how do you know which windows to caulk? Windows with air leaks of a quarter-inch or less are prime candidates for this repair.
Window leaks occur when window seals are broken or pulled away. This happens due to caulk reaching the end of its lifespan or long-term weather exposure. Leaks then allow air inside your home to escape. Drafts and rain can also seep into your home through the cracks.
There are multiple ways to detect leaks around your windows:
- On the outside of your home, check areas where two different materials meet. This includes your window corners and frame.
- Look for cracks in the window panes.
- Examine the existing caulking and weather stripping. Make sure both are in good condition — leaving no gaps or cracks.
- Give your windows a little shake. If they rattle, it is a sign that the frames are not secure and air is likely leaking.
- If you can see daylight around a window frame, there is a leak.
- Shut a window on a dollar bill. If you can effortlessly pull the dollar bill from under the window, the window is not airtight.
- Light a match or stick of incense and hold it around the edges of your windows. Does the flame flicker or does the smoke blow? You have a leak. Pro tip: Make sure you turn off your AC/heating before you do this so you don’t get a false positive.
Best Material for Caulking Windows
For one window, homeowners will likely use a half-cartridge of caulk. The U.S. Department of Energy shares the most common caulking compounds on their website, which vary in strength, properties, and price.
We’ve broken down three of the most popular options below: polyurethane caulk, silicone caulk, and acrylic latex caulk.
Applying Caulk to Cracks and Leaks
Once you’ve selected the best caulk for your home, follow these best practices:
Step One: Preparation
Clean the areas to be caulked, and remove old paint or caulk. A putty knife, screwdriver, or even a rough brush can be used to help clean the area.
Find the Right Contractor for Your Windows Project
Whether you’re ready to begin your project now or need some expert advice, our network of contractors are here to help. With a few simple questions, we’ll find the best local professionals for you
Step Two: Pick a Dry Day
To avoid sealing in moisture, make sure the area that needs window caulking is dry. It is best to apply caulk during dry weather with low humidity. Experts generally recommend it be above 40-45 degrees, as well.
Step Three: Caulking the Windows
Apply caulk to all joints in the window frame, and do not forget the joint where the frame and wall meet.
Hold the gun or product at a 45-degree angle, and caulk in one continuous stream. Make sure the caulk sticks to both sides of a crack.
If caulk comes out of a crack, use a putty knife or screwdriver to push it back in.
Caulking Windows vs. Replacing Windows
If air leaks are your only problem, then it is very unlikely you need to replace the window entirely. However, if your ultimate goal is to have more energy-efficient windows, a different style of window, or a window that functions differently (for example, you want a window that opens up and down instead of cranks open to the outside), then you may want to consider a replacement instead.
When it comes to energy-efficiency, the following questions can help you determine if caulking windows will do enough to help you save money on your utility bills:
- Are your windows more than 15 years old? If yes, you are likely missing out on the benefits of double- or triple-glazed windows. You likely also do not have gas-fill between the panes of glass or low-e glass. All of these upgrades will make your home significantly more energy-efficient.
- Are the gaps around your window more than a quarter-inch? If they are, caulk may not fully seal them. The frames themselves should instead be evaluated by a contractor for repair or replacement.
- Are the frames warped or damaged? Damage typically first shows at the corners of window frames. Warping and other forms of damage are a strong sign you need to replace your windows.
Replacing your windows is a costlier project than repairing them. You may still want to caulk them while you budget for a replacement.

How to Caulk/Seal Replacement Windows
Replacement windows are typically well-sealed, so interior caulking is often optional. Instead, homeowners should pay attention to sealant around the frame where the window fits into the wall opening.
Windows typically come in standard sizes, but when replacing a window, the wall is often altered for the new model. Sealing those gaps is vital to your home’s comfort and energy consumption. Talk to your window replacement contractor about any questions or concerns you may have.
What Not To Do When Caulking Windows
While it may be tempting to seal any and all gaps around your windows, windows require some ventilation to prevent excess moisture from accumulating.
Avoid Caulking:
- The Window’s Weep Hole: This small hole at the bottom of the exterior frame in windows allows moisture behind the window to exit through the frame. If you plug this hole, you could cause mold or rot to grow unchecked.
- Moveable Parts: Caulking moving parts could seal your windows closed. Avoid affecting operable parts, like sashes in a double hung window.
- Trimmed out Windows That Sit Above the Siding: This style is common in many modern homes, where the cladding is carried out to the edge of the window frame. For this design, it is not necessary to seal the joints. Doing so will harm your windows since trimming helps carry excess moisture away from your siding and windows.
- Above the Window Frame: This is a spot to avoid, no matter what kind of window you have installed. This spot is known as a drip edge, and it helps usher rain and snow away from the windows and siding. Closing off this joint can cause moisture to become trapped behind the frame and the edge of the siding.
Find the Right Contractor for Your Windows Project
Whether you’re ready to begin your project now or need some expert advice, our network of contractors are here to help. With a few simple questions, we’ll find the best local professionals for you
-
 cost and budgeting
Affordable Home Upgrades
We’ve all had that moment walking into a room thinking, “It’s fine, but…” Sometimes it’s dated hardware. Sometimes it’s lighting. Sometimes it’s just that nothing feels fresh anymore. Here’s the... -
 HVAC
HVACENERGY STAR Heat Pumps
What Is an ENERGY STAR Heat Pump? An ENERGY STAR heat pump is a heating and cooling system that meets federal efficiency standards set by the U.S. Environmental Protection Agency.... -
 maintenance and care
Natural Gas Generators and Carbon Monoxide: What Homeowners Should Know
Understanding the Concern Natural gas generators are one of the most popular standby power options for homeowners. They connect directly to your home’s gas line, which means no hauling fuel... -
 installation
15 Practical Ways Homeowners Can Use a Generator
More Than Just Backup Power When people think about generators, they often picture them humming away during a blackout. While that is their most common role, generators are surprisingly versatile....
Reviews from Real Homeowners
Welcome to Homeowner Resources! We are the Modernize blog. Modernize pairs more than 3 million homeowners a year with pre-vetted contractors in their area. This blog started because we believe homeowners should know everything about their homes, from how their HVAC works to which front door colors they might love. On Homeowner Resources, you can find information on every part of your home, right down to how you can negotiate with contractors to get the best price. Here's more about the blog.
Need a contractor? Learn more about how Modernize finds the right pro for you.